21. 多檔案上傳
21-1 上傳單張圖片
這一章介紹上傳文檔,示範的情境有:
- Event 活動可以上傳一張 Logo 圖片
- Event 活動可以上傳多張 Images 圖片
- Events 活動可以上傳多個附加文檔,每個文檔有各自的描述說明
在 Rails 中上傳和存儲文檔,最常見使用的 gem 是 carrierwave 和 paperclip,這裡我們使用 carrierwave。
接下來我來實作為 Event 活動上傳一張 Logo 圖片:
編輯 Gemfile
+  gem 'carrierwave'
+  gem "mini_magick"
執行 bundle,重啟伺服器
執行 rails g migration add_logo_to_events logo:string,這會產生一個 migration 內容是為 events 增加一個 logo 欄位。
執行 rake db:migrate
執行 rails g uploader EventLogo
編輯 app/uploaders/event_logo_uploader.rb
  class EventLogoUploader < CarrierWave::Uploader::Base

+   include CarrierWave::MiniMagick

+   version :thumb do
+     process resize_to_fit: [50, 50]
+   end

  end
編輯 app/models/event.rb,把 carrierwave 的 Uploader 掛載上去。
  class Event < ApplicationRecord
+   mount_uploader :logo, EventLogoUploader
編輯 app/views/admin/events/_form.html.erb 加上文檔上傳的輸入框。如果已經有上傳過了,則多顯示刪除的 checkbox。
+  <div class="form-group">
+    <%= f.label :logo %>
+    <%= f.file_field :logo, :class => "form-control" %>
+    <% if f.object.logo.present? %>
+      <label>
+        <%= f.check_box :remove_logo %> 刪除圖檔
+      </label>
+      <%= link_to f.object.logo.filename, f.object.logo.url, :target => "_blank" %>
+    <% end %>
+  </div>

   <div class="form-group">
     <%= f.label :description %>
編輯 app/controllers/admin/events_controller.rb 加上 :logo 和 :remove_logo 到 event_params
  def event_params
-    params.require(:event).permit(:name, :description, :friendly_id, :status, :category_id, :tickets_attributes => [:id, :name, :description, :price, :_destroy])
+    params.require(:event).permit(:name, :logo, :remove_logo, :description, :friendly_id, :status, :category_id, :tickets_attributes => [:id, :name, :description, :price, :_destroy])
  end


編輯前臺的活動頁面 app/views/events/show.html.erb,把圖片顯示出來
+ <% if @event.logo.present? %>
+   <%= link_to image_tag(@event.logo.url(:thumb)), @event.logo.url, :target => "_blank" %>
+ <% end %>

  <h1><%= @event.name %></h1>
最後,上傳的文檔不需要 git commit,所以請編輯 .gitignore 忽略掉 public/uploads 這個目錄。
  # Ignore Byebug command history file.
  .byebug_history
+ /public/uploads/*
這樣就完成了,請在後臺上傳圖片,然後到前臺活動頁就可看到了。
21-2 上傳多檔
情境:Event 活動可以上傳多張 Images 圖片
執行 rails g migration add_images_to_events images:string
執行 rake db:migrate
執行 rails g uploader EventImage
編輯 app/uploaders/event_image_uploader.rb
  class EventLogoUploader < CarrierWave::Uploader::Base

+   include CarrierWave::MiniMagick

+   version :small do
+     process resize_to_fit: [250, 250]
+   end

  end
編輯 app/models/event.rb,把 carrierwave 的 Uploader 掛載上去:
  class Event < ApplicationRecord
    mount_uploader :logo, EventLogoUploader
+   mount_uploaders :images, EventImageUploader
+   serialize :images, JSON
編輯 app/views/admin/events/_form.html.erb 加上文檔上傳的輸入框,注意到因為要支援多檔上傳,多了一個 :multiple => true 參數。
+  <div class="form-group">
+    <%= f.label :images %>
+    <%= f.file_field :images, :multiple => true, :class => "form-control" %>
+    <% if f.object.images.present? %>
+      <label>
+        <%= f.check_box :remove_images %> 刪除圖檔
+      </label>
+      <% f.object.images.each do |i| %>
+        <%= link_to i.filename, i.url, :target => "_blank" %>
+      <% end %>
+    <% end %>
+  </div>

   <div class="form-group">
     <%= f.label :description %>
編輯 app/controllers/admin/events_controller.rb 加上 :remove_images 和 :images => [] 到 event_params
  def event_params
-    params.require(:event).permit(:name, :logo, :remove_logo, :description, :friendly_id, :status, :category_id, :tickets_attributes => [:id, :name, :description, :price, :_destroy])
+    params.require(:event).permit(:name, :logo, :remove_logo, :remove_images, :description, :friendly_id, :status, :category_id, :images => [], :tickets_attributes => [:id, :name, :description, :price, :_destroy])
  end
小心
:images => []要放在最後,因為預設的 Hash 雜湊參數都是放在參數最後

請用 command 點選文檔進行多選
編輯前臺的活動頁面 app/views/events/show.html.erb,把圖片顯示出來。注意到因為是多檔了,所以相比顯示 Logo 多了 .each 循環。
   <h2><%= @event.category.try(:name) %></h2>

+  <% if @event.images.present? %>
+    <% @event.images.each do |i| %>
+      <%= link_to image_tag(i.url(:small)), i.url %>
+    <% end %>
+  <% end %>
這樣就完成了。
21-3 上傳多檔案(使用額外 Model)
上一節的多檔上傳實作,我們用了 serialize :images, JSON 這會將多個文檔的檔名陣列,轉成 JSON 後存儲在 images 欄位之中,Rails 在讀出來的時候,會自動轉回陣列。這一招讓 carrierwave 很簡單就可以支援多檔上傳,它把所有檔名的數據都塞進同一個欄位 images。
不過這種方法有幾個缺點:
- 無法增加每個文檔編輯額外的描述或其他資訊
- 無法為個別的文檔進行更新:重傳的時候,它會全部砍掉然後全部重新上傳
- 上傳的 UI 需要用戶知道用 Command 按鍵才能多選文檔。因此如果是後台管理員還可以教育,前臺一般用戶可能會不知道如何使用。
因此,接下來我們示範如何讓 Events 活動可以上傳多個附加文檔,每個文檔有各自的描述說明。
作法是新增一個 EventAttachment model,然後讓 Event has_many EventAttachment,其中每一筆 EventAttachment 就是一個附加文檔。表單 UI 的部分則使用實戰應用教過的 「嵌套表單(1-to-many」
執行 rails g model event_attachment,我們將讓 Event has_many 這個 EventAttachment model,然後將 carrierwave 也掛載到這個 EventAttachment model 身上。
編輯 201XXXXX025046_create_event_attachments.rb
  class CreateEventAttachments < ActiveRecord::Migration[5.0]
    def change
      create_table :event_attachments do |t|
+       t.integer :event_id, :index => true
+       t.string :attachment
+       t.string :description
        t.timestamps
      end
    end
  end
執行 rake db:migrate
執行 rails g uploader EventAttachment
編輯 app/models/event.rb
   has_many :tickets, :dependent => :destroy
   accepts_nested_attributes_for :tickets, :allow_destroy => true, :reject_if => :all_blank

+  has_many :attachments, :class_name => "EventAttachment", :dependent => :destroy
+  accepts_nested_attributes_for :attachments, :allow_destroy => true, :reject_if => :all_blank
編輯 app/models/event_attachment.rb
  class EventAttachment < ApplicationRecord

+   mount_uploader :attachment, EventAttachmentUploader
+   belongs_to :event

  end
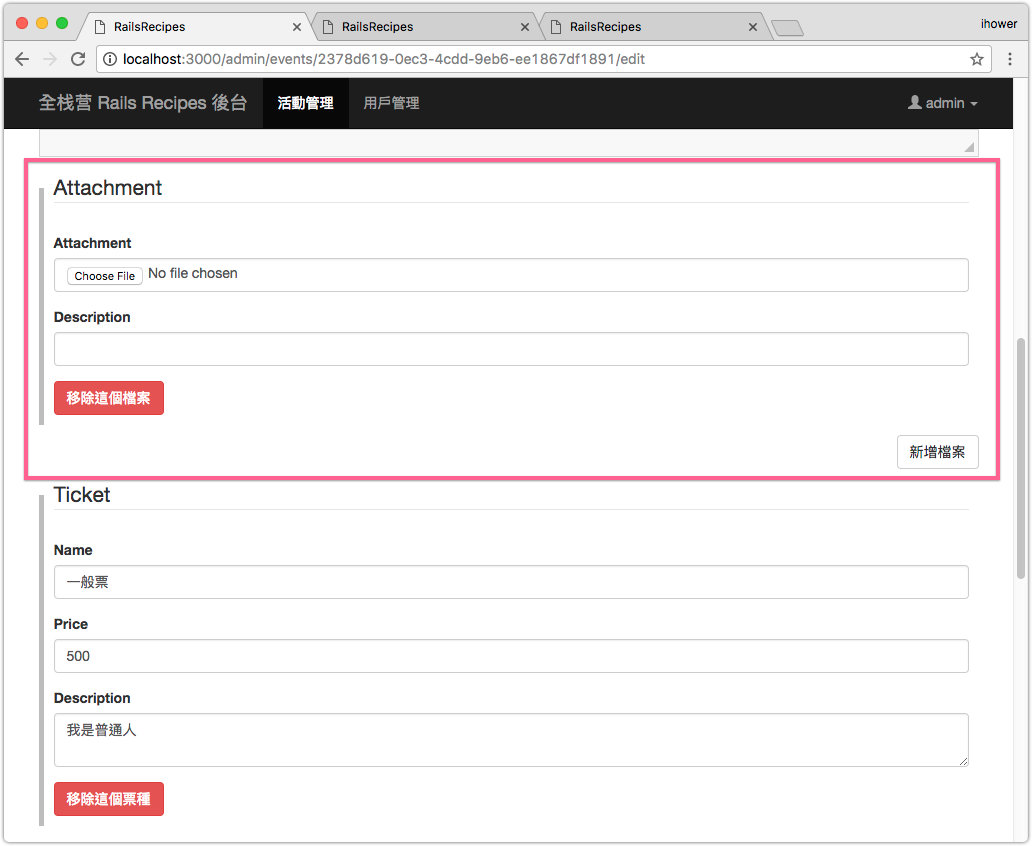
這樣 models 的部分就好了。接著編輯後台表單 app/views/admin/events/_form.html.erb
+ <%= f.nested_fields_for :attachments do |ff| %>
+   <fieldset style="border-left: 5px solid #bbb; margin-bottom: 10px; padding: 10px;">
+     <legend>Attachment</legend>
+     <div class="form-group">
+       <%= ff.label :attachment %>
+       <%= ff.file_field :attachment, :class => "form-control" %>
+       <% if ff.object.attachment.present? %>
+         已上傳檔案 <%= link_to ff.object.description, ff.object.attachment.url, :target => "_blank" %>
+       <% end %>
+     </div>
+
+     <div class="form-group">
+       <%= ff.label :description %>
+       <%= ff.text_field :description, :class => "form-control" %>
+     </div>
+
+     <%= ff.remove_nested_fields_link "移除這個檔案", :class => "btn btn-danger" %>
+   </fieldset>
+ <% end %>
+ <p class="text-right">
+   <%= f.add_nested_fields_link :attachments, "新增檔案", :class => "btn btn-default" %>
+ </p>
+

 <%= f.nested_fields_for :tickets do |ff| %>
編輯 app/controllers/admin/events_controller.rb,如果該 @event 沒有 attachments 的話,new 出來一筆好讓表單可以顯示一筆進行編輯,以及把 attachments_attributes 加進 event_params。
   def new
     @event = Event.new
     @event.tickets.build
+    @event.attachments.build
   end

   # (略)

   def edit
     @event = Event.find_by_friendly_id!(params[:id])
     @event.tickets.build if @event.tickets.empty?
+    @event.attachments.build if @event.attachments.empty?
   end

   # (略)

   protected

   def event_params
-    params.require(:event).permit(:name, :logo, :remove_logo, :remove_images, :description, :friendly_id, :status, :category_id, :images => [], :tickets_attributes => [:id, :name, :description, :price, :_destroy])
+    params.require(:event).permit(:name, :logo, :remove_logo, :remove_images, :description, :friendly_id, :status, :category_id, :images => [], :tickets_attributes => [:id, :name, :description, :price, :_destroy], :attachments_attributes => [:id, :attachment, :description, :_destroy])
   end

編輯前臺 app/views/events/show.html.erb
+  <ul>
+  <% @event.attachments.each do |a| %>
+    <li><%= link_to a.description, a.attachment.url %></li>
+  <% end %>
+  </ul>

  <%= sanitize @event.description %>
這樣就完成了。請在後臺上傳一些文檔和描述,然後到前臺瀏覽看看。