17. 顯示資料驗證錯誤訊息
17-1 顯示資料驗證的錯誤訊息
上一章實作的報名的表單,如果資料驗證沒有通過的話,目前沒有顯示任何錯誤訊息,讓我們補上錯誤訊息。
編輯 app/views/registrations/step2.html.erb
   <h2>Step 2</h2>

+  <% if @registration.errors.any? %>
+    <ul>
+    <% @registration.errors.full_messages.each do |error| %>
+      <li><%= error %></li>
+    <% end %>
+    </ul>
+  <% end %>
編輯 app/views/registrations/step3.html.erb
   <h2>Step 3</h2>

+  <% if @registration.errors.any? %>
+    <ul>
+    <% @registration.errors.full_messages.each do |error| %>
+      <li><%= error %></li>
+    <% end %>
+    </ul>
+  <% end %>
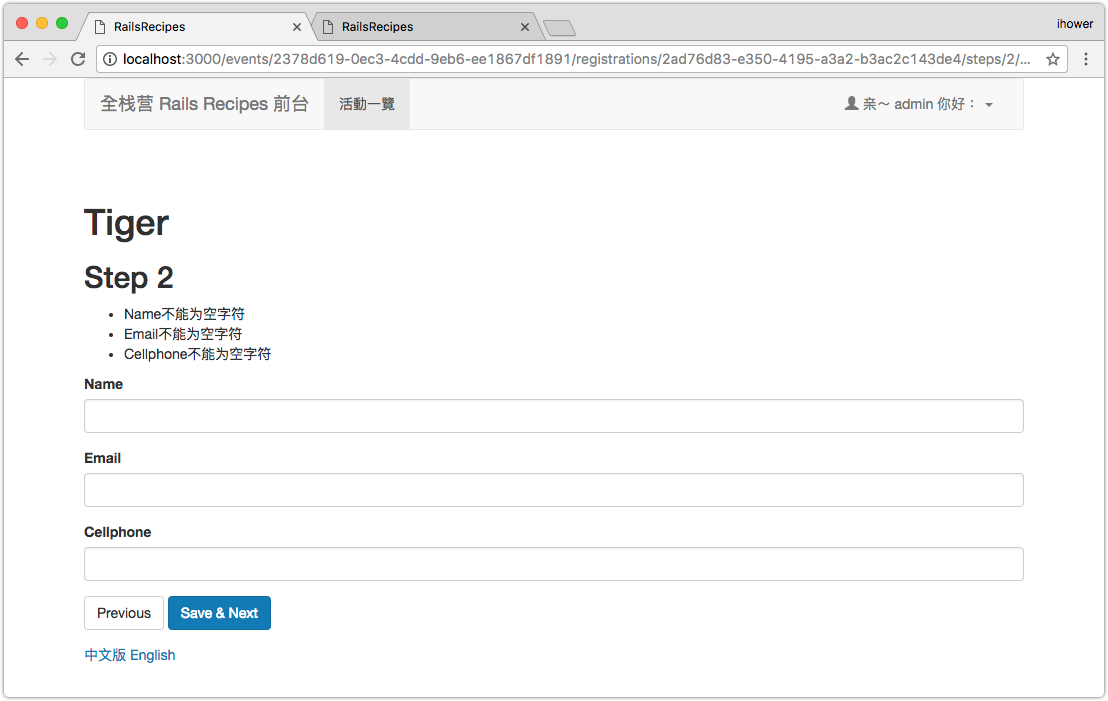
不過,這樣的 UI 只是用起來簡單,但是對用戶並不是很友善,因為眼睛需要上上下下跑,才能找到底出錯的欄位是哪一個。
因此目前公認推薦比較好 UI 作法,是將錯誤訊息放在輸入框旁邊…
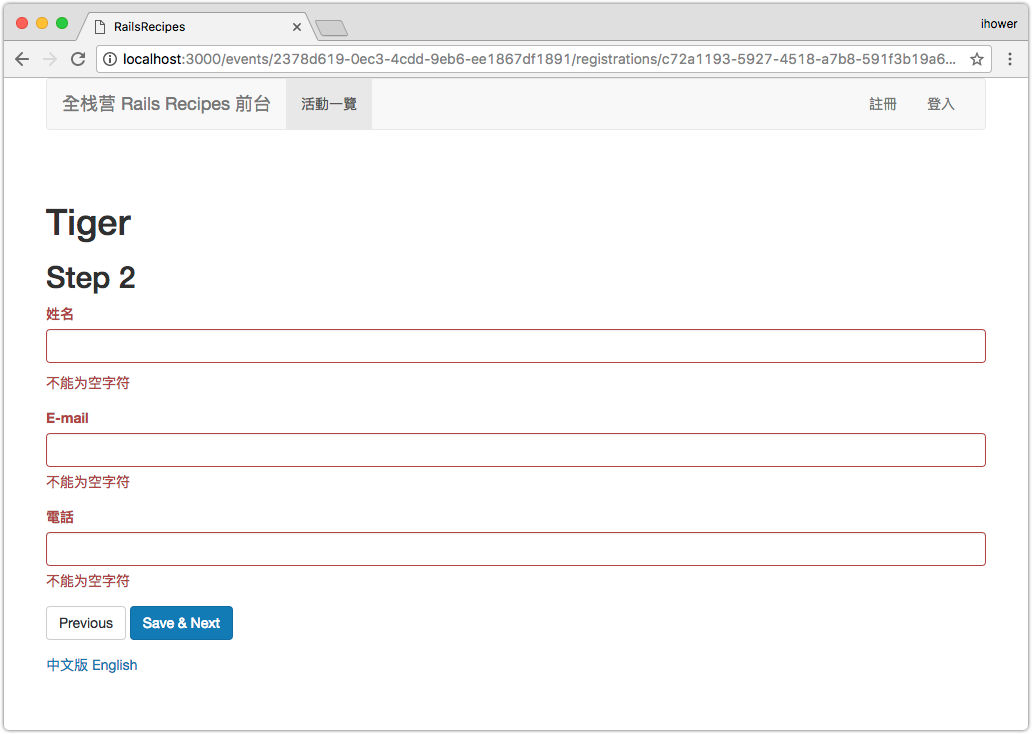
17-2 內聯式(inline)錯誤訊息
像這樣直接把欄位的錯誤訊息,顯示在輸入框旁邊,就非常一目瞭然了。
編輯 app/views/registrations/step2.html.erb
- <% if @registration.errors.any? %>
-   <ul>
-   <% @registration.errors.full_messages.each do |error| %>
-     <li><%= error %></li>
-   <% end %>
-   </ul>
- <% end %>

  <%= form_for @registration, :url => update_step2_event_registration_path(@event, @registration) do |f| %>
-   <div class="form-group">
+   <div class="form-group <%= (f.object.errors[:name].any?)? "has-error" : "" %>">
-     <%= f.label :name %>
+     <%= f.label :name, "姓名", :class => "control-label" %>
      <%= f.text_field :name, :class => "form-control" %>

+     <% if f.object.errors[:name] %>
+       <span class="help-block"><%= safe_join(f.object.errors[:name], "、") %></span>
+     <% end %>
    </div>

-   <div class="form-group">
+   <div class="form-group <%= (f.object.errors[:email].any?)? "has-error" : "" %>">
-     <%= f.label :email %>
+     <%= f.label :email, "E-mail", :class => "control-label" %>
      <%= f.email_field :email, :class => "form-control" %>

+     <% if f.object.errors[:email] %>
+       <span class="help-block"><%= safe_join(f.object.errors[:email], "、") %></span>
+     <% end %>
    </div>

-   <div class="form-group">
+   <div class="form-group <%= (f.object.errors[:cellphone].any?)? "has-error" : "" %>">
-     <%= f.label :cellphone %>
+     <%= f.label :cellphone, "電話", :class => "control-label" %>
      <%= f.text_field :cellphone, :class => "form-control" %>

+     <% if f.object.errors[:cellphone] %>
+       <span class="help-block"><%= safe_join(f.object.errors[:cellphone], "、") %></span>
+     <% end %>
    </div>
解說:
f.object指的是這個form_for表單的 model 物件,也就是@registrationf.object.errors[欄位名稱]是個陣列儲存了這個欄位的錯誤訊息has-error和help-block是 Bootstrap 提供的樣式,這裡配合使用。
17-3 自訂義資料驗證的錯誤顯示
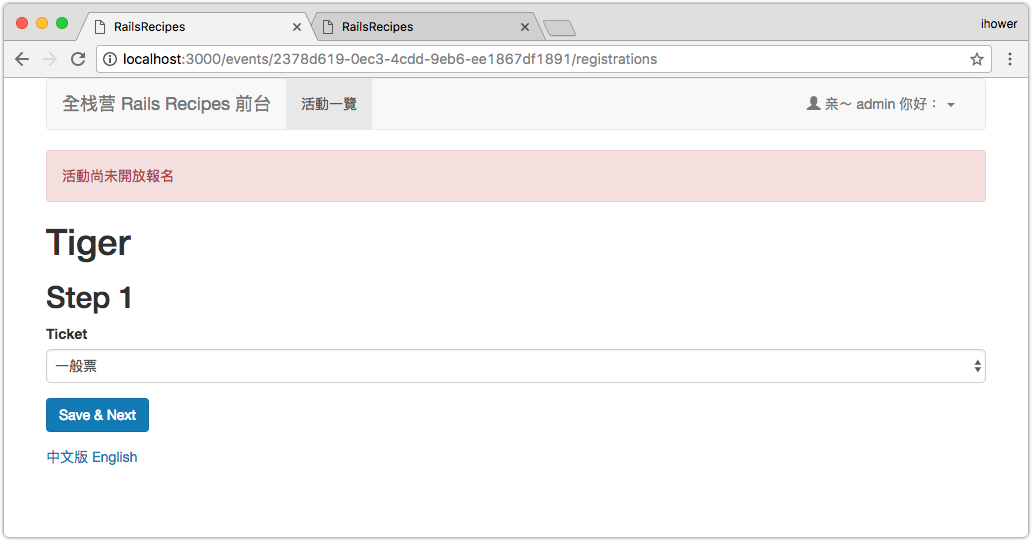
內聯式(inline)錯誤訊息有個小問題,就是有些錯誤不屬於表單上的某個輸入欄位。例如我們來自定義一個資料驗證:如果活動的狀態是 draft 草稿,則不允許新增報名。
編輯 app/models/registration.rb
+  validate :check_event_status, :on => :create

   # (略)

   protected

+  def check_event_status
+    if self.event.status == "draft"
+      errors.add(:base, "活動尚未開放報名")
+    end
+  end
解說:
validate可以增加自定義的資料驗證,後面的:on => :create參數可以指定只有新建才會驗證(預設是新建跟修改都會驗證)- 驗證不通過時,會用
errors.add增加錯誤訊息,第一個參數是欄位名稱,第二個參數是錯誤訊息 - 因為表單上並沒有
event_id這個輸入框,所以就算寫成errors.add(:event_id, "活動尚未開放報名")也沒有地方顯示出來。依照慣例,任何不屬於某個欄位的錯誤,我們會放在:base上。
那怎麽把顯示 errors[:base] 顯示出來?有兩種方法:
方法一:同 17-1 的作法
透過循環 @registration.errors[:base] 把錯誤訊息印出來,例如:
<% if @registration.errors[:base].any? %>
  <ul>
  <% @registration.errors[:base].each do |error| %>
    <li><%= error %></li>
  <% end %>
  </ul>
<% end %>
方法二:用 flash
flash 一般用在 redirect 跳轉頁面前後,用來傳遞提示訊息。這裡也可以沿用 flash 的樣式來顯示資料驗證的錯誤。
編輯 app/controllers/registrations_controller.rb
  def create
    @registration = @event.registrations.new(registration_params)
    @registration.ticket = @event.tickets.find( params[:registration][:ticket_id] )
    @registration.status = "pending"
    @registration.user = current_user
    @registration.current_step = 1

    if @registration.save
      redirect_to step2_event_registration_path(@event, @registration)
    else
+     flash.now[:alert] = @registration.errors[:base].join("、")
      render "new"
    end
  end
本來的 flash 搭配的是 redirect,這會在跳轉後清空 flash 訊息(所以只會顯示一次)。 這裡因為並不是 redirect 跳轉,而是用 render 顯示頁面,這種情況要改用 flash.now。
有研究精神的話,你可以試試看在這裡用
flash[:alert],你會發現出現錯誤訊息之後,再點一次其他頁面,錯誤訊息還會多重復出現一次。
另外,順便修理一下目前的 flash 樣式以配合 Bootstrap。
-  <p class="notice"><%= notice %></p>
+  <% if notice %>
+    <p class="notice alert-success"><%= notice %></p>
+  <% end %>

-  <p class="alert"><%= alert %></p>
+  <% if alert %>
+    <p class="alert alert-danger"><%= alert %></p>
+  <% end %>
請挑一個狀態是 draft 的活動,然後新增報名就會看到以下錯誤了。
17-4 HTML5 前端資料驗證
不過無論是 17-1 或 17-2 的作法,都是屬於伺服器端(server-side)的驗證,這種方式的優缺點是:
- 優點:保證資料會被驗證後,才會存進資料庫
- 缺點:用戶一定要按下送出,資料經過伺服器驗證,才會看到錯誤訊息,因此反應速度比較慢
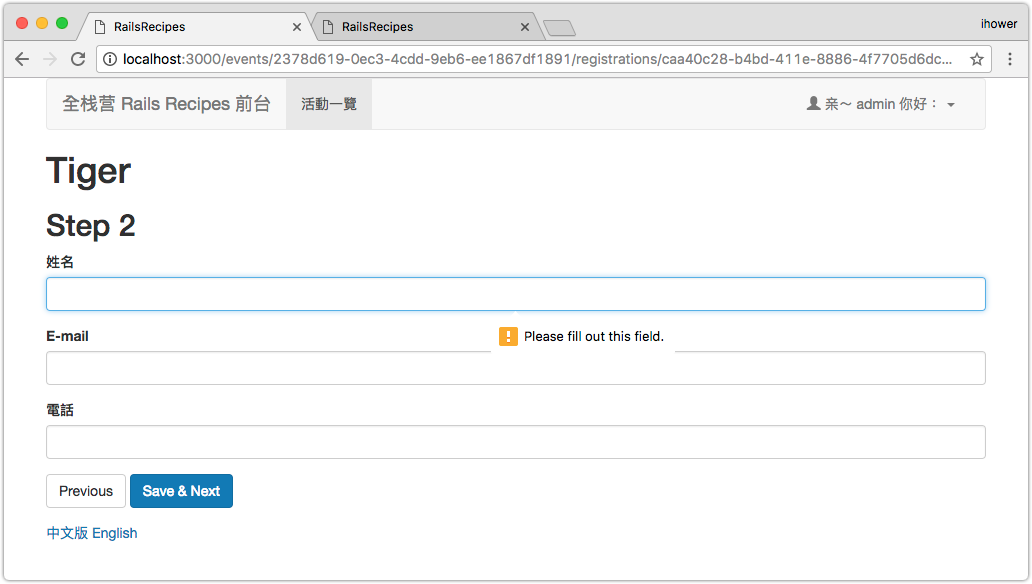
但有些簡單的驗證,前端就可以做了,例如檢查必填,這種事情根本不需要後端做,在前端就可以辦到了。
在 HTML5 就有定義了一些常見的驗證方式,讓我們加上去:
編輯 app/views/registrations/step2.html.erb
-    <%= f.text_field :name, :class => "form-control" %>
+    <%= f.text_field :name, :class => "form-control", :required => true, :autofocus => true %>

     # (略)

-    <%= f.email_field :email, :class => "form-control" %>
+    <%= f.email_field :email, :class => "form-control", :required => true %>

     # (略)

-    <%= f.text_field :cellphone, :class => "form-control" %>
+    <%= f.text_field :cellphone, :class => "form-control", :required => true %>
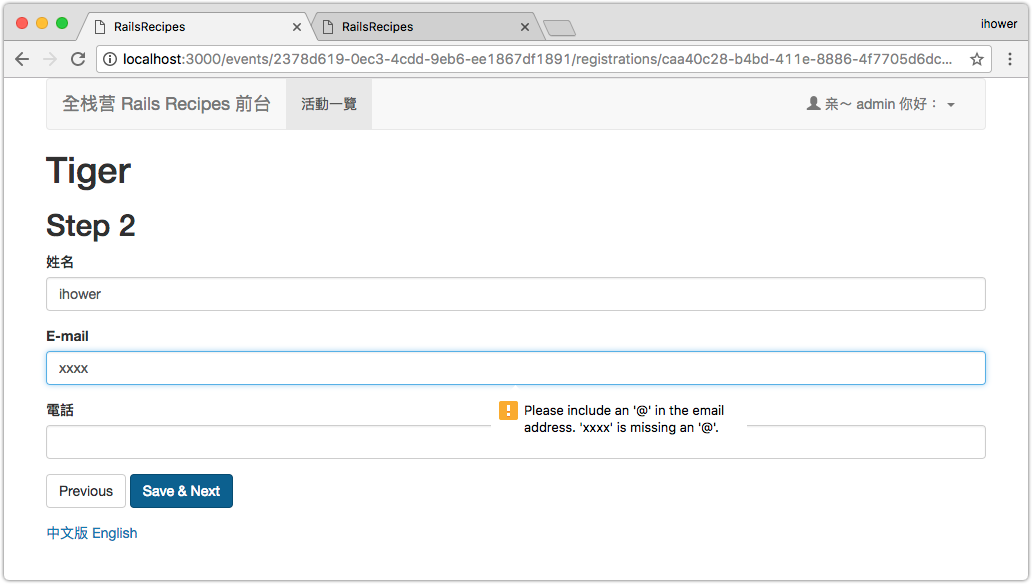
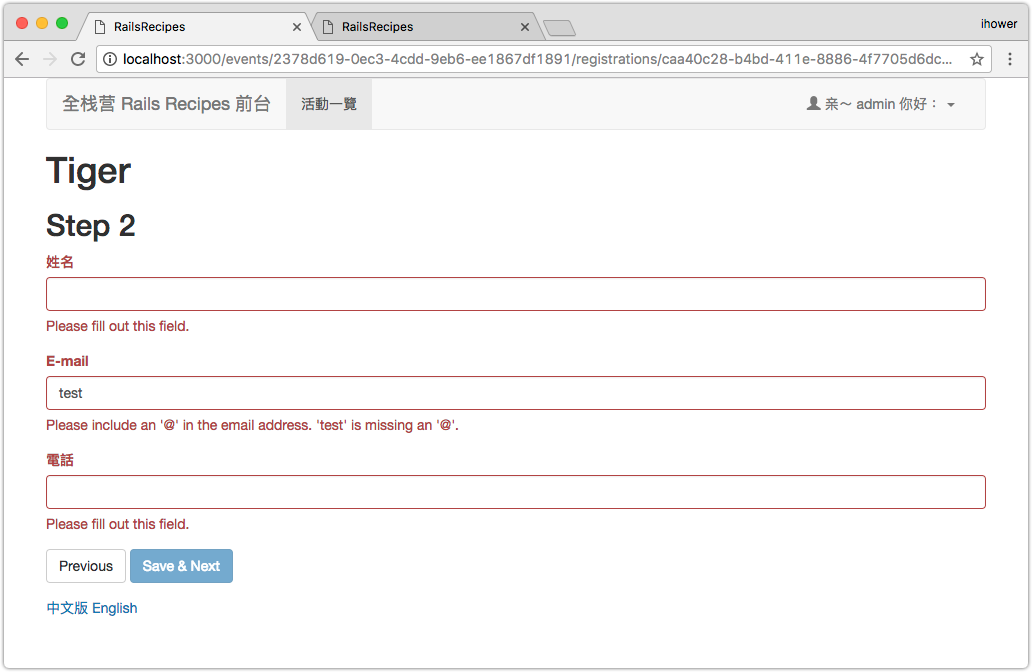
透過 required 就可以讓瀏覽器做必填的資料驗證了,按下送出會看到以下畫面。
實際產生出來的 HTML 源碼是這樣:
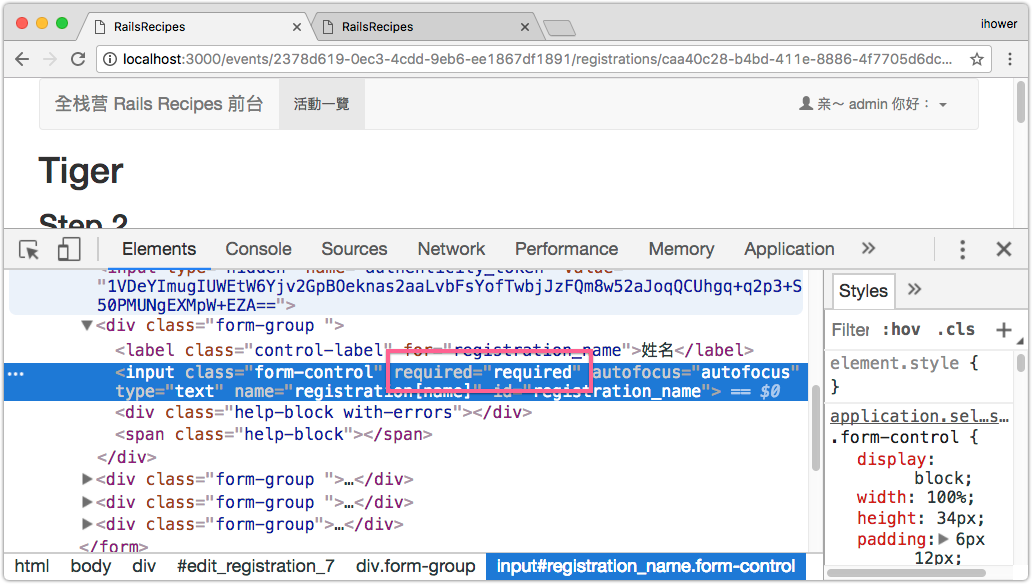
透過 input 的 required="required" 屬性,瀏覽器就會檢查必填了,這個錯誤訊息的樣式是瀏覽器自帶的。
Protip:
:autofocus => true可以在進到這一頁時,自動將光標鎖定在這一個輸入框,這樣用戶就可以馬上入坑開始填寫。一個頁面只能有一個輸入框用 autofocus。
另外 Email 這個輸入框,我們也不是用 f.text_field :email,而是用 f.email_field :email,這是 HTML5 新的輸入類型:
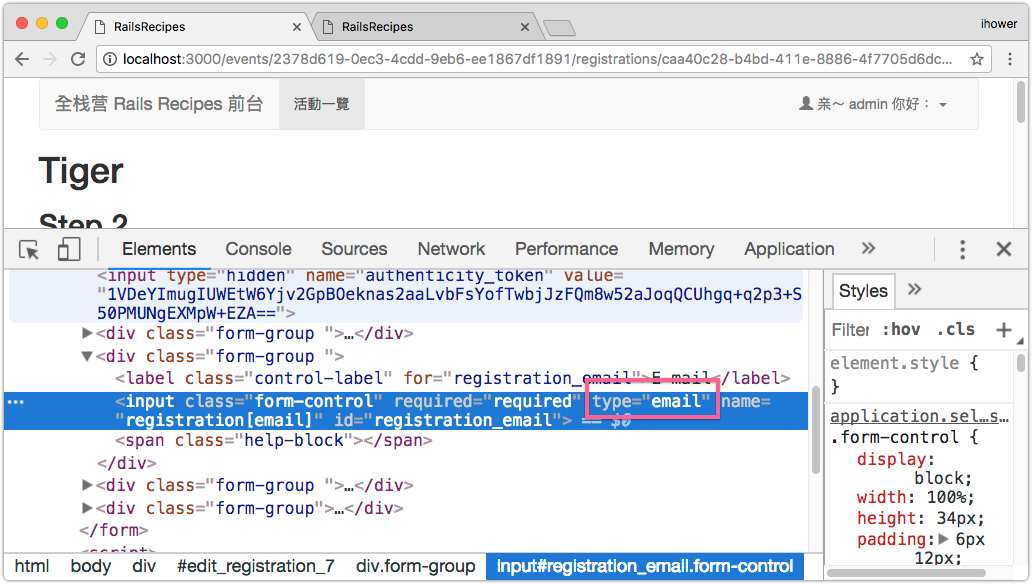
外觀看起來跟一般文字輸入框一模一樣,但會讓瀏覽器檢查 E-mail 格式:
最後,第三步表單的 Website 欄位,注意到我們是用 f.url_field :website 而不是 f.text_field :website,這會讓瀏覽器檢查輸入的文字必須是網址格式。
17-5 前端套件資料驗證
上述的 HTML5 驗證是瀏覽器內建的,如果想要更漂亮的特效,我們可以考慮安裝其他前端的套件,參考 10 jQuery Form Validation Plugins 我們挑一套 Bootstrap Validator 來試試看。
這個前端套件沒有包好的 Gem 可以安裝,請手動下載 validator.min.js 這個 javascript 檔案,放在 vendor/assets/javascripts/ 目錄下。
然後修改 app/assets/javascripts/application.js 加載它
+  //= require validator.min
   //= require_tree .
編輯 app/views/registrations/step2.html.erb
  <h2>Step 2</h2>

+ <% if @registration.errors.any? %>
+   <ul>
+   <% @registration.errors.full_messages.each do |error| %>
+     <li><%= error %></li>
+   <% end %>
+   </ul>
+ <% end %>

  <%= form_for @registration, :url => update_step2_event_registration_path(@event, @registration) do |f| %>

-   <div class="form-group <%= (f.object.errors[:name].any?)? "has-error" : "" %>">
+   <div class="form-group">
      <%= f.label :name, "姓名", :class => "control-label" %>
      <%= f.text_field :name, :class => "form-control", :required => true, :autofocus => true %>

-     <% if f.object.errors[:name] %>
-       <span class="help-block"><%= safe_join(f.object.errors[:name], "、") %></span>
-     <% end %>
+     <div class="help-block with-errors"></div>
    </div>

-   <div class="form-group <%= (f.object.errors[:email].any?)? "has-error" : "" %>">
+   <div class="form-group">
      <%= f.label :email, "E-mail", :class => "control-label" %>
      <%= f.email_field :email, :class => "form-control", :required => true %>

-     <% if f.object.errors[:email] %>
-       <span class="help-block"><%= safe_join(f.object.errors[:email], "、") %></span>
-     <% end %>
+     <div class="help-block with-errors"></div>
    </div>

-   <div class="form-group <%= (f.object.errors[:cellphone].any?)? "has-error" : "" %>">
+   <div class="form-group">
      <%= f.label :cellphone, "電話", :class => "control-label" %>
     <%= f.text_field :cellphone, :class => "form-control", :required => true %>

-     <% if f.object.errors[:cellphone] %>
-       <span class="help-block"><%= safe_join(f.object.errors[:cellphone], "、") %></span>
-     <% end %>
+     <div class="help-block with-errors"></div>
    </div>

    <div class="form-group">
      <%= link_to "Previous", step1_event_registration_path(@event, @registration), :class => "btn btn-default" %>
      <%= f.submit "Save & Next", :class => "btn btn-primary" %>
    </div>

  <% end %>

+ <script>
+   $("form").validator();
+ </script>
以下是最後成果,這個前端套件的作法更為精緻,它會編輯完一個輸入框就驗證一次,而不是最後按送出才驗證。反應速度非常好。
解說:
- 因為內聯式(inline)錯誤訊息改成用前端套件來處理,因此這裡拆掉 17-2 做的。
- 前端驗證是不可靠的,用戶只要關閉瀏覽器的 JavaScript 就可以跳過前端驗證。以防萬一,我們還是把傳統的錯誤訊息方式加回來,如果前端驗證失效時,至少還可以看到錯誤訊息。
剩下 Step 3,請編輯 app/views/registrations/step3.html.erb
   <div class="form-group">
     <%= f.label :website %>
     <%= f.url_field :website, :class => "form-control" %>

+    <div class="help-block with-errors"></div>
   </div>

   <div class="form-group">
     <%= f.label :bio %>
-    <%= f.text_area :bio, :class => "form-control" %>
+    <%= f.text_area :bio, :class => "form-control", :required => true %>

     <div class="help-block with-errors"></div>
   </div>

  # (略)

  <script>
    $("form").validator();
  </script>